Tuesday, 4 June 2013

Wreckage

Saltwick bay photograph

I'm now around two thirds of the way through my first drawing of Saltwick Bay here in North Yorkshire. It started with a couple of snaps I'd taken while on holiday - I hadn't expected much from them because I didn't want to interrupt our time off by getting all artsy with the camera. When I got back, I looked at the one above and decided I could do something with it.

Hour 4 of my wreck and rock drawing

 As usual I'm working on Fabriano Artistico extra white - a lovely smooth paper great for getting sharp lines. I normally work in charcoal pencil but since the wreck cast a shadow you could almost reach out and touch, I needed something even blacker than that !

Hour  9 of my wreck and rock drawing

So, it's out with the Wolffs carbon pencil again - I love these because they produce such a rich, velvety black but unfortunately they also produce an amazing amount of fine dust that sticks to everything...

I'm also still using charcoal pencil for very fine detail, it's harder and can be sharpened to a needle point so I'm tracing the outlines with that, filling in with carbon and blending it up to the edge. That way I've got a lovely crisp silhouette with the added impact of the carbon. I'm hoping to have this one done in the next week or two as I'm keen to get stuck into its mate - a view of the imposing rock formation in the background. Will keep you posted :)

Monday, 20 May 2013

Eyeing up

There's great excitement here as we the launch of the Forgotten project- a joint venture between myself and Caroline Willmot looking at the mythological creatures of Britain. This has been a huge amount of fun to do as it's given me free reign to dismantle those creatures and rebuild in a way that works. 


The really fascinating thing is that when we started looking at all this from a scientific point of view - location, distribution, feeding and mating habits then building the anatomy - so many of these fantastic creatures suddenly became much more plausable. So, throw out everything you thought you knew about mermaids, fairies and goblins because they just got real !


 This drawing of a mermaids eye complete with protective membrane was done in charcoal and carbon pencil on Fabriano watercolour paper. It was a challenge to do as the face shape and skin texture are different to ours- they also have no hair. I could go on for hours but that's what the projects is for so you'll have to wait :)


We will be publishing this project in stages- one paper for each creature, which will be available from my Etsy shop. It's such a mammoth project that we decided each species deserved its own turn in the spotlight. 


We also need to say a huge thank you to my partner Rich for his imaginative input (many a happy hour spent discussing critters over a glass of wine or three). You can follow regular updates on Facebook.

Tuesday, 19 March 2013

My dark tower...

 We were lucky this weekend to be invited to join artist Tina Mammoser on a stay near Whitby. We only live up the road but working from home, it's somehow so much harder to organise time away so we jumped at the opportunity. On Sunday, we braved the weather to go explore Saltwick Bay, at one end of which stands the impressive Black Nab, which I naturally made a beeline for...


Black rock formation on a bed of shale, sillhouetted against a cloudy sky - what more could a goth artist ask for ? Just when I thought it couldn't get any better, we dicovered that close by lie the remains of the Admiral Von Tromp which ran aground in 1976 under mysterious circumstances.
 
 
 Many people have obviously taken amazing photographs of the rich landscape there and I'm not going to pretend I've achieved anything of the sort but the great thing about being an artist is... it doesn't matter :) I've picked these three to start working on and I'll do more editing to bring out the reflections on the rock but for quick snaps taken on the hoof, I'm really rather pleased. I'll definitely be going back but I can see the potential for charcoal drawings in these so I'm just going to get on with it.


You can remind me I said that.

Wednesday, 13 March 2013

Making my dream a reality

 Here in the studio it's grow-your-own-monster time again. Stephen is ready for his next drawing which means digging out all my original reference materials and sourcing any additional bits I might be needing. The first drawing I did of him was my usual side on shot with no background. These are like the studies of animals and plants in journals, giving a clear view of the whole thing.


 From there, it's about bringing him to life so everyone can see him the way I do- moving about, doing his own thing.... 

 Happily, this time I have a scale model of Stephen to help me figure out things like perspective and play with light sources. All of my monsters start out life in my red sketchbook.


 Once I've got an idea of who I'm drawing and what they're up to, I look up all of the bits of anatomy I'm going to need to make sure that what I'm doing is actually possible - one of my main rules is that each creature must function. They may have supernatural aspects such as Stephens' ability to misdirect but that's no excuse for my being sloppy and getting his shoulders in the wrong place :)


With my current drawing, I started by using my original layout for him which is a simple straight line drawing to scale of all the important bits- head, torso, limbs. Using the photo of my model in a similar position, I made adjustments for our imaginary camera angle. Then it's starting with his skeleton to position everything correctly.


That's important because that affects what muscles are working and so the surface appearance. The muscles are noted on an additional layer then the outline of that becomes my blueprint for the final drawing.


It's in the final version that the whole thing is skinned over and things like wrinkles, veins and hair are added to make it real. I'll be posting the progress of that final image as I go so you can watch him come out of my imagination and into our world :)


Wednesday, 9 January 2013

Shadows

More fun with monsters here this week- I've done the first prints of our model Stephen for me to draw from. Not only have they made life a whole lot easier in terms of getting perspective and lighting right but there have been some unexpected bonuses...


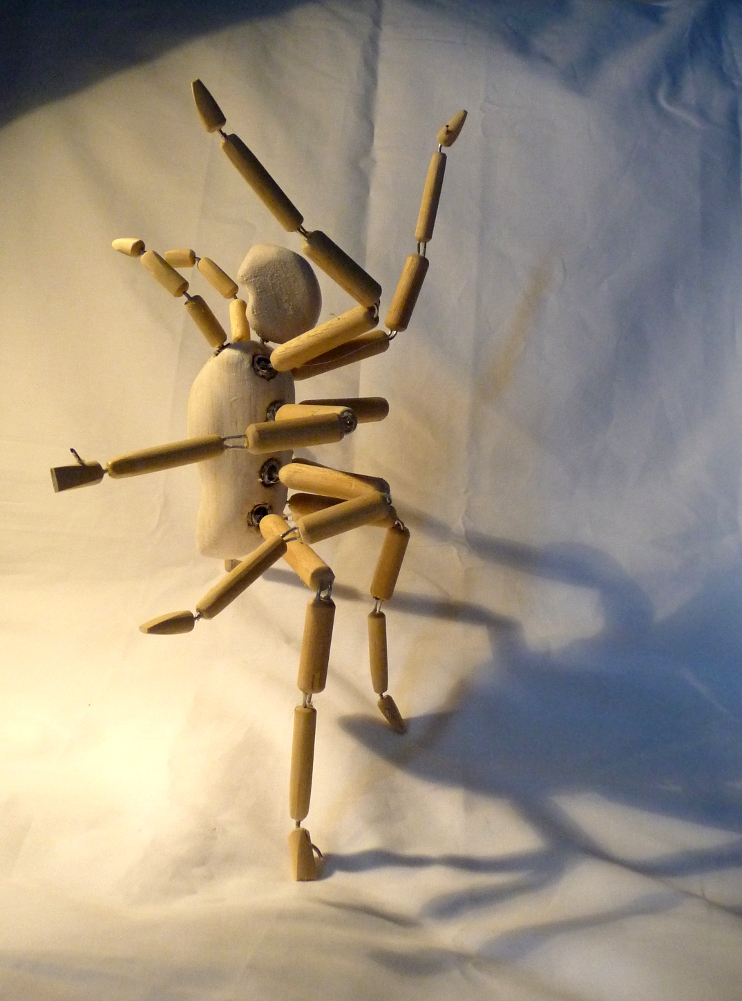
Probably the most fascinating thing I've seen so far is how his shadow changes depending on how I light the model. Sometimes it's very spider-like as with the picture above, other shots have a man shaped shadow like the one below (which I'm sure is sneaking off on its own).


He's not attached to a base because we already have plans for a bigger, more mobile version which is a slightly worrying thought. For now I'm making good use of my paper stubbies by way of props.


Because these pictures are just for reference I also don't have to worry about them being perfectly crisp which means I've been able to play about with my camera and get some interesting shots of him creeping about in the dark - the one above is a test for one of him looking in a window. He does that...


Monday, 24 December 2012

Baubles !

 It may come as a surprise to some but goths do Christmas too - complete with tree (and no, it's not black). We even added some shiny silver baubles, not that they stayed on there for long....
 Those who read our last post know we've made a model Stephen using, amongst other things, some of our tree decorations. But where, you wanted to know, were his baubles ?


To get the range of movement we needed in his shoulders we needed ball and socket joints - we could have bought them online but having come up with the idea of making a Stephen, naturally we wanted to play with it now and couldn't wait that long.


 We had a bag of black plastic beads left over from making bookmarks and some tubing that would fit into that to make our ball- but what to use for the socket? It turned out that the little collar with the hanging loop on top of our baubles was just the right size- and joy of joys, they simply pop off !


 We cut a small section of tubing and glued it into the hole in the bead. Rich cut a hole in the top of the collar and threaded the ball part through post first to complete the set.


 The collar was then glued into a hole cut into the main body, making sure not to get any adhesive on moving parts ...


When that had set, the post was covered in glue and slotted into a hole drilled in each of the limbs. Then we had to wait impatiently for the whole thing to dry before we could play with it :)


The first model was such a success and has already been useful in setting up drawings that we then made a hand to scale for him. Of course, that did mean going to buy another tub of baubles......

Tuesday, 18 December 2012

Monster in motion


 From an artists' point of view, demons have a lot in common with cats- they don't want to know until it looks like something else is getting all the attention... of course, those of you who know Stephen already will appreciate why, when it comes to elbowing everyone else out of the way, he wins every time.


That's all well and good but he's not the easiest thing to draw straight from my head, it's far too easy to wind up with a bit on backwards/upside down. So over coffee Sunday morning I asked my other half if he thought we could make a model of some kind. That way, I could play with different compositions and get all my lighting right before starting a big piece.


 I'll get into the 'how' properly in my next post but you may be amused to know that our new Christmas decorations didn't last long on the tree before we found an altogether more fun use for them :)
Of course, I'm saying 'we' but you're probably under no illusion that I had anything much to do with the actual construction asides from working out the sizes of various bits, some sanding and the important task of watching what was going on. 


Today the last of the glue had dried and I was able to start playing with him- just some test shots with a lamp of a new pose I was working on but he's amazingly effective - I can even get him stood on his back legs reaching up and adjust his limbs in sequence. Of course, I now want one of each of our resident nightmares done like this - best get some more baubles in !


This last has to be my favourite shot so far, stretching up - that shadow makes me grin every time I look at it :) In my next post I'll get into more detail of how we did it, then in the new year drawing should start in earnest of Stephen in action...